Tuesday, August 31, 2010

Village Boutique Giveaway!!

That's right -- it's time for an AWESOME giveaway today!  Have you've all been chomping at the bit since my teaser yesterday in excited anticipation!?! :)

Okay - well you know already all about Village Boutique (and if you don't, you can read all about it here) and how amazing their jewelry is.  And now they are my wonderful sponsors, too!

Today she's been SO generous, and offered to give one of you a fantastic silverware bracelet!  AAAAH!  Are you SO excited!?!  I'm so excited for you!  I LOVE this jewelery!  It's completely unique and amazing! 

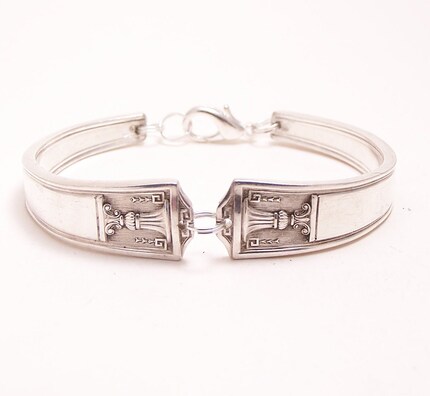
Here's what's up for the winning:  An Alhambra pattern, discontinued in 1907.  The width of this is 5/8" - and she will make another one identical to this so that it fits the winner.


And do you remember her blog I told you about yesterday that has interesting facts about each year of her spoon jewelry?  Well she shared with me some interesting facts about these spoons, too:

The average life expectancy in the U.S. was 47 years old


Only 14 percent of the homes in the U.S. had a bathtub


Only 8% of the homes in the U.S. had a telephone


A 3 minute call from Denver to New York City cost $11.00


There were only 8,000 cars in the U.S., and only 144 miles of paved roads


The maximum speed limit in most cities was 10 mph


Most women only washed their hair once a month; and used Borax or egg yolks for shampoo


More than 95% of all births in the U.S. took place at home


The average wage in the U.S. was 22 cents per hour


The population of Las Vegas, Nevada was only 30!
Alabama, Mississippi, Iowa, and Tennessee were each more heavily populated than California
Hershey milk-chocolate Kisses are introduced by Hershey Chocolate Co. to compete with Buds, sold by a Lititz, Pa., candy maker since 1893 (by the time that blue-and-white paper streamers are added in 1921 Hershey will be turning out millions of Kisses per day)
And these spoons were there through all of it!

Aren't those cool facts!?!

SO, here's the deets on this week's fantastic giveaway:

WHAT:   
An Alhambra pattern, discontinued in 1907.  The width of this is 5/8" - and she will make another one identical to this so that it fits the winner

UNTIL WHEN:   
Giveaway is open until 9/7/2010 at Midnight

HOW: 
1.  For your first entry, visit Village Boutique and tell me what your favorite bracelet is
2.  For your second entry become a follower -- and make sure to leave a comment telling me that you are!
3.  And for an extra entry, leave a comment telling me what your favorite fact was :)


A HUGE thanks to Village Boutique for this beautiful giveaway!


Monday, August 30, 2010

Check these out!

First, I want to say thank you to everyone who sent me wonderful emails introducing themselves.  I'm so excited to get to "meet" you all and introduce you to the rest of my readers and followers!  (If you haven't sent me your email yet, you can get all the details here).

Well today, I'd like to introduce you to an absolute GEM -- Village Boutique.  (They are also the newest sponsor of the Hand Me Down House!)


The minute I saw this fantastic shop, I knew you gals would love these bracelets and goodies too.  One of the most awesome things about these bracelets is that they are completely unique, which means no one will see your bracelet and say, "I have the SAME one from Target!" (Don't you hate when that happens!?!).  The spoons that she uses are from years when they didn't have machines to replicate the pattern -- so they are hand-crafted designs.

Village Boutiques has bracelets, key chains, necklaces and bracelets with charms -- and they are all made out of silverware!  They are fantastic!  Here are a few of my favorites:


What's even more amazing is to see how most of the spoons are originally found (before she cleans them up and makes then into beautiful jewelry):


Incredible right!?!

The spoon fanatic behind Village Boutique learned her crafting and creating skills from her Grandpa as a little girl.  Over the years she's perfected her craft and well, you've seen the outcome -- amazing jewelry!  She puts so much love and care into each piece of jewelry she creates - and it shows; they are beautiful!

And just like me she's fascinated by history and the thought of where this silverware may have come from and who may have used it over the past hundred years.   I think that's what initially intrigued me about this amazing jewelry -- it's already older than I am, yet it's a brand new piece that was JUST created. 

She also has a fascinating blog that has TONS of interesting and fun facts about the spoons she uses for her bracelets -- so your jewelry comes with a mini history lesson too!

These bracelets would make wonderful gifts too!  You could give your mom or grandma a truly unique, meaningful gift of a bracelet that was originally made in a year that was special to them -- a birth year, an anniversary year?  How special would that be?!

I'm SO excited to have this wonderfully, beautiful jewelry here!  And I'm SO glad I got to share it with all of you, too!  Be sure to visit these little gems at Village Boutique!  

Be sure to stay tuned for tomorrow, too -- you might just have a chance to get one of these awesome pieces for yourself! :)


Saturday, August 28, 2010

Winner Winner!

So it's time to announce the winner of the Mandy's Yellow Corner Giveaway!

Thanks again to Mandy for being so wonderfully sweet and offering you guys a peice of her fantastic hand-stamped jewelry!

I hope you all enjoyed looking around her adorable store and blog, too :)

Alright and the winner is:


Traveling Thrifter said... 90
I follow you! Of course I follow you...why wouldn't I?
CONGRATULATIONS HEATHER!


Friday, August 27, 2010

It's nice to meet.....YOU

Over the past few months things have changed A LOT at this little blog.  When I first started out, I LOVED being able to visit all your blogs and see what you guys have been up to, too.  While I'm lov-ing the fact that there are just over 700 of you who want to read my blog and are interested in my weird ideas (it means the WORLD to me!) -- it also means that I'm not able to visit every single one of YOUR blogs.  I LOVE all you readers and followers -- and I've thoroughly enjoyed "getting to know" some of you.    And because I want to continue to get to know all of you, we're going to start a little something different over here at the Hand Me Down House.


Every week or so, I'd like to meet one of YOU (yes you!) and introduce you to everyone else around who here who follows along too.  

What does that mean, you ask!?

It means send me an email and introduce yourself to us! :)  Be sure to send me a link to your blog and links or pictures of what you've been up to lately -- projects, crafts -- anything you'd like to share with us. 


I can't wait to get your emails and get to know more of you out here in blogland!

Wednesday, August 25, 2010

Birthday Chalkboard


Frames Frames Frames -- I can NEVER get enough frames -- or chalkboard paint for that matter.

And with that winning combination, let me share with you today's project :)

Last month was my bestie's birthday.  And not only has she been my best friend since high school, she's also the loving soul behind One Girl, One Beautiful Life.   She had JUST moved into a cute little apartment and I wanted to give her something decor-esque, but also something she could USE too.  Enter the chalkboard frame.  I started with this find from a local thrift store.  The frame had cute little designs on it, so I snatched this puppy up.


This framed print reminds me of the one I used for my fabric whiteboard a while back -- I wonder if they were some sort of set?!?!

I removed the frame and spray-painted it green (one of her favorite colors) and then I painted the glass with my beloved chalkboard paint.  I also took some ribbon (the same I used for my welcome sign) and attached it to the back and tied it on top for a pretty bow.  Ready for the final project?


I also gave her one of those cool chalkboard pens ....which are AWESOME!  Isn't that green fantastic!?!


I just LOVE finding unique frames....I seriously could have my whole house covered in gorgeous, character-filled frames and never get tired of them.   I think Becca likes the frame too. :)

Linking up to:
Mondays:Between Naps on the Porch ; C.R.A.F.T; Craft-O-Maniac; Keeping it Simple; Mad in Crafts; Making the World Cuter; The DIY Showoff; The Girl Creative Tuesdays:  All Thingz Related; House of Grace; I'm Topsy Turvy; Lucky Star Lane; Sugar Bee Craft Edition; The CSI Project; These Creative Juices; Today's Creative Blog Wednesdays:  Blue Cricket Design; Creations by Kara; Debbiedoos; Domestically Speaking; My Backyard Eden; Night Owl Crafting; Seven Thirty Three; Someday Crafts; The Thrifty Home; Trendy Treehouse Thursdays: Beyond the Picket Fence; Craftastical!; Fireflies & Jellybeans; House of Hepworths; Life as Lori; Somewhat Simple; The Shabby Chic Cottage Fridays:  Chic on a Shoestring; Finding Fabulous; Fingerprints on the Fridge; Frou Frou Decor; Frugal & Fabulous Design; It's a Hodge Podge Life; It's Fun to Craft!: Just a Girl; Remodelaholic; Simply Designing; The Shabby Nest; Tatertots & Jello Weekend:  A  Little Lovely; Be Different Act Normal; Funky Junk Interiors; House of Thrifty Decor; I Heart Naptime; Kuzak's Closet; Under the Table & Dreaming


Tuesday, August 24, 2010

Cleaning and Thank Yous


First, I want to say thank you to all the wonderful blogs out there who featured my projects in the last two weeks (sorry -- I'm still a little behind from being out of town)  So here they are; the folks that made my day and shared my little crafts and improvements:

Remodelaholic

Fireflies & Jellybeans

Shanty 2 Chic

Tatertots & Jello

The CSI Project

Simpsonized Crafts

Cottage Instincts

House of Grace


And secondly, I got quite a few emails and comments yesterday asking about the Tupperware of homemade disinfecting wipes that I keep in fancy new "broom closet".

I'll give you the disclaimer first though. :)  This is a mixture made with Lysol -- I'm not promoting Lysol, nor do I think it's the BEST way to disinfect -- it's just one of the cheapest options I've found.  I decided to try this becuase I seriously was spending a small fortune on buying Clorox and Lysol wipes from the store every week and it was getting a little ridiculous -- but they are SO convenient that I couldn't give them up.  And I don't know that I'd recommend these homemade wipes for sticky fingers and faces -- I just use them for the counters and other places that the messes appear on.  So, all that being said, it's time for the run down on how to make these things.

What You'll Need:

Concentrated Lysol
Papertowels
Rubbermaid Containers
Boiling Water

Directions:

1.  Fold your paper towels.  There are two ways you can do this:  a) fold up about 70-80 paper towels (regular size or more if you are using make-a-size) into whatever size fits into your Rubbermaid container (it's an easy thing to do when you're on the phone or watching TV).  You may need to split this between two containers if yours isn't big enough -- that's what I do and then I split the liquid mixture in half too; 

or b) cut a roll of paper towels in half and put them into a cleaned out container (I've heard a left over Folger's Coffee container works really well).

2.  Bring two cups of water to a boil.

3.  Add 1/4 cup of concentrated Lysol and immediately remove from heat.

4.  Let the liquid cool slightly, and then pour over your paper towels. (if you're using the half roll method, take out the cardboard out when it's soggy and then pull your homemade wipes out starting at the center).

As I'm typing up these directions I'm thinking I should start doing the "half roll" method -- it seems a lot easier!  I'm going to have to find some sort of round container now! :)

Monday, August 23, 2010

Broom Closet Makeover

I'm going to guess that most people have a junk drawer in their house -- you know that place where any odd or end could get shoved in and it seems to be it's permanent home.  Well in our house we have a junk closet.  Yes it's true -- a whole closet that is full of stuff -- from cleaning supplies, to dog treats, to shopping bags and more -- it all ended up there.  I didn't realize how messy this was until I tried to put my new Swiffer Sweeper Vac (that I won from Kuzak's Closet -- be sure to link up for the Sister Sister Sunday link party they have!) in my broom closet and there was no room for it.  Then I saw how scary it was...so look at the mess below at your own risk.


EEEEK! Didn't I tell you it was ghastly!?!  Seriously -- this is how we live behind closet doors sometimes.  I had tried several times to clean it out and make it a bit more organized, but it never stayed that way.  There just wasn't enough useful storage space in this closet; or as my Mom's family calls it, the telephone booth (apparently when she was growing up in a house of four kids and one phone, they would take the phone into the "telephone booth" and make their calls in privacy -- away from the rest of the eaves droppers.  To this day, that is what a broom closet is called -- the phone booth). 

So the first step, obviously, is to clean that puppy out!  I removed my million and two plastic shopping bags and recycled most of them at Target.  (They have bins you can drop off unwanted plastic bags at each store).


At least we're starting with a blank slate now.  After I constructed my own shelves in our bathroom nook -- I knew this would be a perfect place for similar shelves.  I wanted white shelves, but I thought it might look weird with with the oak inside.  On the other hand I DEFINITELY didn't want to paint the inside of that closet white -- that sounded extremely tedious and a little overkill -- although I won't lie -- it would be SO nice.  That's when I had the idea to use adhesive drawer liner for the inside. 


I bought this stuff at Target for only $5.60!  And there is plenty of it left over.  I measured, cut and adhered my liner to the inside of my closet.  


Then I constructed my shelves, just like the ones in our bathroom.  They have a 1x2 on each side with a board laid across them and some trim in front to keep it pretty.  You can read more about how to make these shelves here.


Much better, right?

I also bought a plastic bag dispenser from SimpleHuman at Target for $8.99 and put some baskets that I found a for a few dollars at Joanne's and thrift stores inside too.  Now we have a much more organized space to hold daily cleaning supplies, bags, and doggy treats.  


On that first shelf I have my homemade disinfecting wipes in a Rubbermaid container , along with some baskets full of ready to use garbage bags and Swiffer Sweepers and then a basket full of our chargers for vacuums and other household things.  Our middle shelf is full of Ruby's treats and food and the bottom shelf holds a recycling bin (otherwise we have empty cans, bottles and boxes sitting on top of our fridge waiting to be brought outside) and our beloved Swiffer.   I also added some cork board squares to the door to post things like stamps, important phone numbers -- you know all the good stuff.

I usually have my Dust Buster and my apron hanging up in there -- but I took them down so you could see the rest of the closet. :)  Most of the original "junk" stayed in the closet -- just more organized; but some of it got moved to other, more practical places in the house.


And we now have a home for our new Swiffer!  It makes life so much easier to be organized -- and it doesn't hurt when it's pretty too! :)


Linking up to:
Mondays:Between Naps on the Porch ; C.R.A.F.T; Craft-O-Maniac; Keeping it Simple; Mad in Crafts; Making the World Cuter; The DIY Showoff; The Girl Creative Tuesdays:  All Thingz Related; House of Grace; I'm Topsy Turvy; Lucky Star Lane; Sugar Bee Craft Edition; The CSI Project; These Creative Juices; Today's Creative Blog Wednesdays:  Blue Cricket Design; Creations by Kara; Debbiedoos; Domestically Speaking; My Backyard Eden; Night Owl Crafting; Seven Thirty Three; Someday Crafts; The Thrifty Home; Trendy Treehouse Thursdays: Beyond the Picket Fence; Craftastical!; Fireflies & Jellybeans; House of Hepworths; Life as Lori; Somewhat Simple; The Shabby Chic Cottage Fridays:  Chic on a Shoestring; Finding Fabulous; Fingerprints on the Fridge; Frou Frou Decor; Frugal & Fabulous Design; It's a Hodge Podge Life; It's Fun to Craft!: Just a Girl; Remodelaholic; Simply Designing; The Shabby Nest; Tatertots & Jello Weekend:  A  Little Lovely; Be Different Act Normal; Funky Junk Interiors; House of Thrifty Decor; I Heart Naptime; Kuzak's Closet; Under the Table & Dreaming

Friday, August 20, 2010

Recycled Picture Frame

A few weeks ago while I was at HomeGoods I saw these adorable little magazine picture frames -- they were so cute!  And as much as I loved them and HAD to have them, I just couldn't overlook that $14.99 price tag.  It definitely wasn't a NEED -- so I sadly left without them.  But don't worry-- I'm a problem solver, so I came up with a way to make my own -- so here's the how-to for you thrifty, do-it-yourself, blog-loving gals. :)

First I went to the Dollar Tree and got a two pack of 4x6 frames for $1.00.  

Then I grabbed a stash of old magazines that I hadn't thrown away yet.  (I think I've mentioned before that I have a slight problem throwing things away)

I cut out a good variety of text only pages, colorful ads, and a mix of both.  


 Then I grabbed a handful of skinny drinking straws (not the extra fat ones like McDonald's gives out).


And here's where the project begins .....


 I glued each straw to the BACK of the magazine page I wanted to use.  And here's a tip for you -- you don't have to use the whole page -- and actually I would recommend using a piece of the page.  You aren't going to roll up a lot of paper -- just a little bit.  Now, LET THE GLUE DRY!  Be patient and just make sure it's completely hardened before you decide to roll up the magazine page -- it makes it easier, believe me. :)  I tried the hard way first.


 Now roll up those magazine pages!  You can see above that I don't have a lot rolled up.  I only twisted the page about two times around the straw.  Now take your glue gun and glue the edge almost like you're sealing the roll together.  Wait for it to dry and then cut the excess paper off.


Now keep making rolls of magazine pages until your hands are numb.  No, just kidding. :)  I did these while we were watching TV, and it took no time at all.   It all depends on the size of your frame -- I did four straws per side -- so 16 straws.  You want to make sure they are really squished together so there's no frame showing through.


 Okay -- this is the toughest part.  I cut my straws at a 45 degree angle to make a nice "seam" in the corners -- but I've seen frames that do it differently -- so be creative and make it however you want. :)  And I'm sorry -- but I have no good tips for cutting your straws at a 45 degree angle.  I just used the trial and error method. Probably not the best advice to give -- but it worked for me. :)


I glued first straw on the outside and let it hang over the edge slightly.  Then I glued the remaining straws as close to each other as possible -- you want them to hang over the edge a little so you can't see the dollar store frame.  Even the corners should be squished together.


And once everything is glued on, take some high-luster Mod Podge and paint a light coat on the magazine rolls.  Let it dry, and you should have this:


Definitely not perfect  -- but for $.50, it's not too bad. :)  I'm going to try to make another one with the other frame, so hopefully by then I'll get down how to make a perfect magazine roll.

Linking up to:
Mondays:Between Naps on the Porch ; C.R.A.F.T; Craft-O-Maniac; Keeping it Simple; Mad in Crafts; Making the World Cuter; The DIY Showoff; The Girl Creative Tuesdays:  All Thingz Related; House of Grace; I'm Topsy Turvy; Lucky Star Lane; Sugar Bee Craft Edition; The CSI Project; These Creative Juices; Today's Creative Blog Wednesdays:  Blue Cricket Design; Creations by Kara; Debbiedoos; Domestically Speaking; My Backyard Eden; Night Owl Crafting; Seven Thirty Three; Someday Crafts; The Thrifty Home; Trendy Treehouse Thursdays: Beyond the Picket Fence; Craftastical!; Fireflies & Jellybeans; House of Hepworths; Life as Lori; Somewhat Simple; The Shabby Chic Cottage Fridays:  Chic on a Shoestring; Finding Fabulous; Fingerprints on the Fridge; Frou Frou Decor; Frugal & Fabulous Design; It's a Hodge Podge Life; It's Fun to Craft!: Just a Girl; Remodelaholic; Simply Designing; The Shabby Nest; Tatertots & Jello Weekend:  A  Little Lovely; Be Different Act Normal; Funky Junk Interiors; House of Thrifty Decor; I Heart Naptime; Kuzak's Closet; Under the Table & Dreaming


Thursday, August 19, 2010

Hand Stamped Jewelry Giveaway from Mandy's Yellow Corner!

We have some more exciting things going on today at the Hand Me Down House .... it's time for another giveaway!  

And get this.....it's from another Mandy! (Although last week to be specific, it was from Mandie).  :)

  
This is Mandy over at Mandy's Yellow Corner has been so incredibly sweet -- she wants to give one of YOU one of her beautiful hand-stamped necklaces!  How excited are you gals!?!  These hand-stamped necklaces are absolutely adorable -- and she will personalize them for you with names, dates and birthstones.  Here are some of her beautiful hand-stamped creations:


Not only does she do hand-stamped jewelry, but her Etsy shop has oodles of cute clutches, necklaces and headbands -- all of it SO cute!

Aaaaand, not only does she have adorable pretties for you to buy -- she has a wonderful blog where she has tutorials to repurpose clothes and shoes, make necklaces, and more!

In case you're wondering -- here are a few of my favorite tutorials of Mandy's:

How to perfectly paint dishes


So how do you win a beautiful piece of hand stamped jewelry?  Here's all the details:

WHAT:  One hand-stamped single pendant necklace at Mandy's Yellow Corner

HOW LONG:  This giveaway runs from today, 8/19 through 8/26 at Midnight

HOW TO WIN: (in this order)

1.  For your first entry; go to Mandy's Yellow Corner Etsy and come back and tell me what your favorite item is -- any item you would want to buy. :)

 2.  For your second entry; become a follower of Mandy's Yellow Corner Blog (be sure to come back and tell me that you follow her in a separate comment)

3.  For your third entry; become a follower here and leave me a comment letting me know that you are.

Ready, Set -- SHOP!! :)
Related Posts with Thumbnails